
In the field of aerial photography, a common misconception persists among enthusiasts and even intermediate practitioners: the belief that "the higher the drone flies, the better the photo." This assumption, rooted in the novelty of the "God’s-eye view" and the desire to capture expansive scenes, often leads to missed creative opportunities and technically flawed images. In reality, altitude selection is a nuanced decision that directly impacts a photograph’s subject expression, spatial hierarchy, and visual clarity—far more critical than simply maximizing flight height.
1. Altitude Determines Subject Expression: Highlight the Subject’s Unique Traits
Aerial subjects (e.g., buildings, natural formations, landscapes) reveal different qualities at varying heights, which can be categorized into three key ranges:
a. Low Altitude (5–30 meters)
This range emphasizes the subject’s verticality and textural details. At 5–10 meters, a drone acts like a "flying boom arm," capturing the subject’s sides and vertical dimensions—ideal for highlighting the height of a cliff, the architectural details of a building’s facade, or the rugged edges of a mountain. For example, photographing a coastal sea stack from 15 meters will emphasize its towering presence against the ocean, whereas a higher altitude might reduce it to a small, indistinct shape.
b. Mid Altitude (30–100 meters)
The "golden zone" for balancing vertical and horizontal features, mid altitudes reveal both the subject’s sides top. This creates three-dimensionality and depth, making it perfect for subjects where structure and context matter. For instance, shooting a grid of urban buildings from 60 meters will showcase both the layout of the streets (top view) and the height of the structures (side view), allowing viewers to grasp the city’s spatial organization. Similarly, photographing an Arctic ice floe from 50 meters— as in the Greenland example—reveals both the textured surface of the ice (top) and its submerged, turquoise underbelly (side), creating a dynamic, visually striking composition that low or high altitudes could not achieve.
c. High Altitude (100+ meters)
This range prioritizes horizontal patterns and large-scale context over individual details. At 150+ meters, subjects appear as flat, two-dimensional shapes—suited only for emphasizing geometric patterns (e.g., a patchwork of farm fields, the symmetry of a stadium) or capturing vast landscapes (e.g., a desert’s sand dune formations). However, high altitudes risk reducing distinct subjects to insignificant elements: a prominent cliff face, when shot from 200 meters, may blend into the surrounding terrain, losing its sense of scale and drama.
2. Altitude Shapes Spatial Hierarchy: Build Depth Through Partial Occlusion
As established in photographic principles of spatial design, partial occlusion (where foreground subjects block part of the background) is the most effective way to signal distance. For example:
If photographing two parallel walls (foreground and midground), a low altitude (5 meters) will result in the foreground wall fully blocking the background one—creating a flat, single-layered image with no sense of depth.
Raising the drone to 20 meters allows the background wall to peek out from behind the foreground one. This partial overlap tells viewers: "The foreground wall is closer; the background wall is farther away," instantly building spatial hierarchy.
Continuing to raise the drone to 80 meters eliminates occlusion entirely—both walls appear side-by-side, with no visual cue to their relative distance. The image reverts to a flat, two-dimensional composition, losing all sense of depth.
Real-World Application: Urban and Landscape Photography
This principle is equally vital in complex scenes. In Singapore’s Marina Bay, for instance, photographing the petal-shaped ArtScience Museum against the background of financial district skyscrapers works best at 40–50 meters. At this height, the museum’s petals partially block the lower floors of the skyscrapers—creating a clear foreground-midground relationship that makes the composition feel compact and layered. Flying higher (e.g., 100 meters) would separate the museum and skyscrapers entirely, turning the image into a disjointed collection of buildings with no visual flow.
Similarly, in landscape photography, a mid altitude (60–80 meters) allows foreground elements (e.g., a lake shoreline) to partially occlude midground features (e.g., a forest) and background mountains. This layering guides the viewer’s eye from the nearest to the farthest elements, creating a sense of journey and immersion that high-altitude "panoramas" (which often lack occlusion) cannot match.
3. Altitude Balances Background Richness and Visual Clarity
A common motivation for flying higher is to "include more of the scene"—to capture a broader context. While this can be valuable, higher altitudes also introduce a critical tradeoff: more background = more clutter. The key is to select an altitude that includes just enough context to support the subject, without overwhelming it with irrelevant details.
As altitude increases, the drone’s field of view expands, pulling in more elements—some relevant, many not. For example:
A low altitude (20 meters) focuses on a single courtyard and its surrounding traditional buildings, with minimal background distraction. The subject is clear, and details (e.g., roof tiles, wooden beams) are sharp.
Raising the drone to 60 meters includes adjacent streets and more buildings, adding context about the city’s layout without sacrificing the courtyard’s prominence.
Flying to 150 meters, however, pulls in distant modern high-rises, power lines, and parking lots—elements that clash with the "ancient city" theme and dilute the subject’s impact. The image becomes a chaotic mix of old and new, with no clear focal point.
Finding the Balance: Subject-First Altitude Selection
The solution is to prioritize the subject’s needs over the desire for "more context." Ask: What background elements are essential to understanding the subject? For example:
If photographing a waterfall in Patagonia to emphasize its power and scale, a mid altitude (50 meters) is ideal: it includes the waterfall’s full height (foreground), the river it feeds (midground), and a hint of the surrounding mountains (background)—without adding distant, irrelevant valleys or scattered shrubs.
If the goal shifts to showcasing Patagonia’s autumn foliage, a higher altitude (120 meters) makes sense: it captures the full expanse of red and gold forests, with the waterfall acting as a secondary element to highlight the landscape’s beauty.
This balance also applies to technical clarity. Higher altitudes increase the distance between the drone and the subject, reducing resolution and detail—especially in lower-light conditions. A subject shot from 200 meters will appear significantly softer than the same subject shot from 50 meters, even with a high-quality lens. For images that require sharpness (e.g., architectural details, product photography from above), a lower-to-mid altitude is non-negotiable.
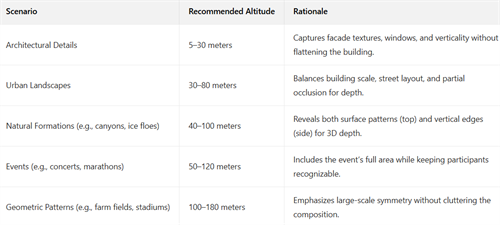
4. Practical Guidelines: Altitude Ranges for Common Scenarios
To translate these principles into action, here are evidence-based altitude recommendations for the most common aerial photography scenarios, paired with safety and regulatory considerations:
Regulatory and Safety Notes:
a. Global Regulations: Most countries cap civilian drone flight at 120 meters (e.g., China, EU, U.S.). Exceeding this height risks fines and safety hazards (e.g., collisions with aircraft). Always check local laws before flying.
b. Obstacle Avoidance: Lower altitudes require extra caution around trees, power lines, and buildings. Use the drone’s obstacle-sensing features and fly in "sport mode" only in open areas.
c. Weather Considerations: Wind speeds increase with altitude. In gusty conditions, lower altitudes (below 50 meters) provide more stability, reducing camera shake and ensuring sharper images.
The myth that "higher is better" in aerial photography stems from a misunderstanding of altitude’s role: it is not a measure of skill or equipment performance, but a creative tool to serve the subject. The best aerial photographs are not those taken at the highest possible height, but those where altitude is selected intentionally— to highlight the subject’s unique traits, build spatial depth, and balance context with clarity.
Recommend:
Does a drone fly higher, does the resulting photo quality get better?
How to Look Natural and Photogenic in Photos?
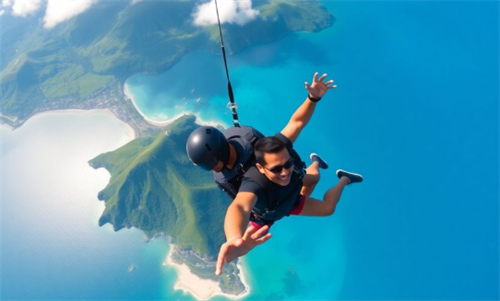
Extreme Sports Travel Checklist: Skydiving, Paragliding, Bungee Jumping – Which One Are You Up For?
Self-Driving Tour in Tibet: Crossing National Highway 318 and Arriving at the Place Closest to Heaven